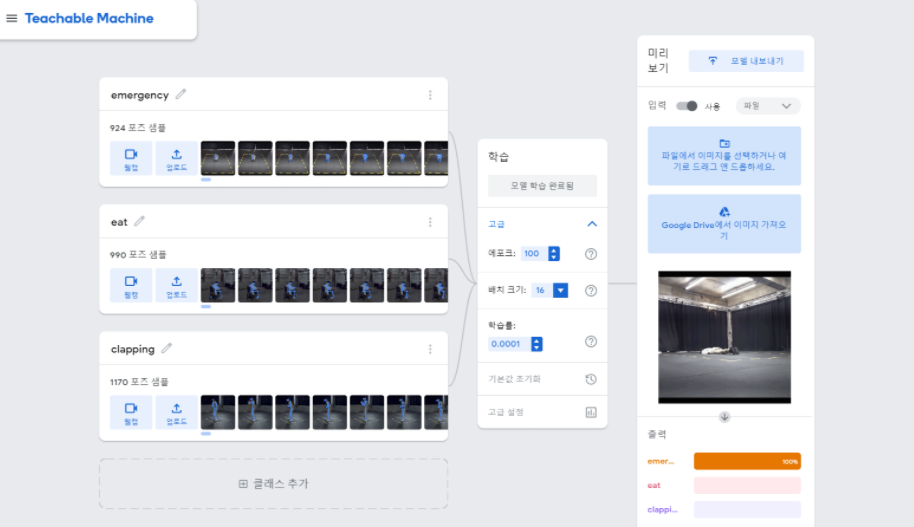
Eye-Remocon
Eye-Remocon

 $ npm i @teachablemachine/pose@0.8.6 --save
 $ npm i @tensorflow/tfjs@1.3.1 --save
 $ npm i canvas --save
 $ npm i express --save
$ pip install requests
import requests
import base64
import time


start = time.time()
with open('이미지파일', 'rb') as f:
    im_b64 = base64.b64encode(f.read()).decode('utf8')

payload = {'img_base64':im_b64}
headers = {}
url = 'http://localhost:3000/pose_detection'

r = requests.post(url, json=payload, headers=headers)

if r.ok:
    pose = r.json()
    print(pose)
    print("time :", time.time() - start)

Main : 시작점
Local Emotion detection model과 AWS Rekognition 서비스를 나눠서 실행
main에서 제일 먼저 Local Emotion detection model에서 감정인식된 결과값을 받기
감정인식되지 않으면 “None”값을 반환하여 none값이면 AWS Rekognition 서비스 이용해서 감정인식 수행하도록 구현
import base64
import io
import numpy
import aws_emotion_detection
import home_emotion_detection
from PIL import Image
from flask import Flask, request, jsonify


app = Flask(__name__)

@app.route('/main', methods=['POST'])
def main():
    payload = request.form.to_dict(flat=False)
    im_b64 = payload['image'][0]
    im_binary = base64.b64decode(im_b64)
    buf = io.BytesIO(im_binary)
    face_img = Image.open(buf).convert('RGB')
    open_cv_face_image = numpy.array(face_img)

    detection_result = home_emotion_detection.detection(open_cv_face_image)
    if detection_result == None:
        detection_result = aws_emotion_detection.aws_main(im_binary)

    return jsonify({"emotion":detection_result})

if __name__ == "__main__":
    app.run(debug=True, host='0.0.0.0', port=9900)
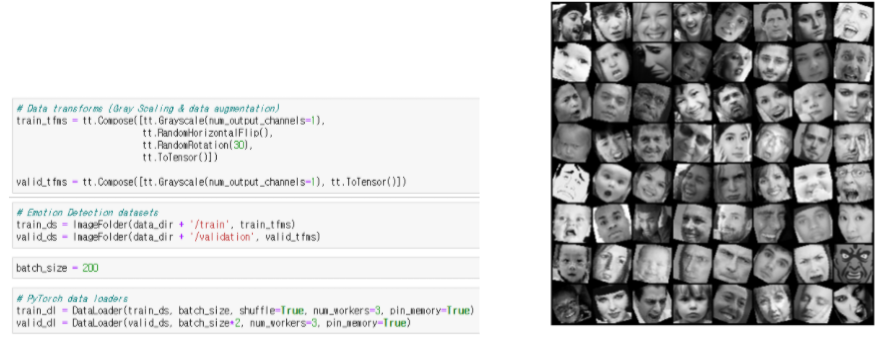
import cv2
import numpy as np
import torch
import torch.nn as nn
import torch.nn.functional as F
import torchvision.transforms as tt

def conv_block(in_channels, out_channels, pool=False):
    layers = [nn.Conv2d(in_channels, out_channels, kernel_size=3, padding=1),
              nn.BatchNorm2d(out_channels),
              nn.ELU(inplace=True)]
    if pool: layers.append(nn.MaxPool2d(2))
    return nn.Sequential(*layers)

class ResNet(nn.Module):
    def __init__(self, in_channels, num_classes):
        super().__init__()

        self.conv1 = conv_block(in_channels, 128)
        self.conv2 = conv_block(128, 128, pool=True)
        self.res1 = nn.Sequential(conv_block(128, 128), conv_block(128, 128))
        self.drop1 = nn.Dropout(0.5)

        self.conv3 = conv_block(128, 256)
        self.conv4 = conv_block(256, 256, pool=True)
        self.res2 = nn.Sequential(conv_block(256, 256), conv_block(256, 256))
        self.drop2 = nn.Dropout(0.5)

        self.conv5 = conv_block(256, 512)
        self.conv6 = conv_block(512, 512, pool=True)
        self.res3 = nn.Sequential(conv_block(512, 512), conv_block(512, 512))
        self.drop3 = nn.Dropout(0.5)

        self.classifier = nn.Sequential(nn.MaxPool2d(6),
                                        nn.Flatten(),
                                        nn.Linear(512, num_classes))

    def forward(self, xb):
        out = self.conv1(xb)
        out = self.conv2(out)
        out = self.res1(out) + out
        out = self.drop1(out)

        out = self.conv3(out)
        out = self.conv4(out)
        out = self.res2(out) + out
        out = self.drop2(out)

        out = self.conv5(out)
        out = self.conv6(out)
        out = self.res3(out) + out
        out = self.drop3(out)

        out = self.classifier(out)
        return out

def detection(face_picture):
    face_classifier = cv2.CascadeClassifier('./models/haarcascade_frontalface_default.xml')
    model_state = torch.load('./models/emotion_detection_model_state.pth')
    class_labels = ['ANGRY', 'DISGUS', 'FEAR', 'HAPPY', 'NEUTRAL', 'SAD', 'SURPRISE']
    model = ResNet(1, len(class_labels))
    model.load_state_dict(model_state)

    gray = cv2.cvtColor(np.ascontiguousarray(face_picture), cv2.COLOR_BGR2GRAY)
    faces = face_classifier.detectMultiScale(gray, 1.3, 5)
    for (x, y, w, h) in faces:
        cv2.rectangle(face_picture, (x, y), (x + w, y + h), (255, 0, 0), 2)
        roi_gray = gray[y:y + h, x:x + w]
        roi_gray = cv2.resize(roi_gray, (48, 48), interpolation=cv2.INTER_AREA)

        if np.sum([roi_gray]) != 0:
            roi = tt.functional.to_pil_image(roi_gray)
            roi = tt.functional.to_grayscale(roi)
            roi = tt.ToTensor()(roi).unsqueeze(0)

            # make a prediction on the ROI
            tensor = model(roi)
            pred = torch.max(tensor, dim=1)[1].tolist()
            label = class_labels[pred[0]]
            return label

        else:
            return 'No Face'
#Copyright 2018 Amazon.com, Inc. or its affiliates. All Rights Reserved.
#PDX-License-Identifier: MIT-0 (For details, see https://github.com/awsdocs/amazonrekognition-developer-guide/blob/master/LICENSE-SAMPLECODE.)
import boto3


def detect_faces(photo):
    client = boto3.client('rekognition')
    response = client.detect_faces(Image={'Bytes': photo}, Attributes=['ALL'])
    for faceDetail in response['FaceDetails']:
        return faceDetail['Emotions'][0]

def aws_main(face_image):
    photo = face_image
    face_emotion = detect_faces(photo)
    return str(face_emotion['Type'])
if __name__ == "__main__":
    app.run(debug=True, host='0.0.0.0', port=9900)
    detection_result = home_emotion_detection.detection(open_cv_face_image)
    if detection_result == None:
        detection_result = aws_emotion_detection.aws_main(im_binary)


def conv_block(in_channels, out_channels, pool=False):
    layers = [nn.Conv2d(in_channels, out_channels, kernel_size=3, padding=1),
              nn.BatchNorm2d(out_channels),
              nn.ELU(inplace=True)]
    if pool: layers.append(nn.MaxPool2d(2))
    return nn.Sequential(*layers)

class ResNet(ImageClassificationBase):
    def __init__(self, in_channels, num_classes):
        super().__init__()

        self.conv1 = conv_block(in_channels, 128)
        self.conv2 = conv_block(128, 128, pool=True)
        self.res1 = nn.Sequential(conv_block(128, 128), conv_block(128, 128))
        self.drop1 = nn.Dropout(0.5)

        self.conv3 = conv_block(128, 256)
        self.conv4 = conv_block(256, 256, pool=True)
        self.res2 = nn.Sequential(conv_block(256, 256), conv_block(256, 256))
        self.drop2 = nn.Dropout(0.5)

        self.conv5 = conv_block(256, 512)
        self.conv6 = conv_block(512, 512, pool=True)
        self.res3 = nn.Sequential(conv_block(512, 512), conv_block(512, 512))
        self.drop3 = nn.Dropout(0.5)

        self.classifier = nn.Sequential(nn.MaxPool2d(6),
                                        nn.Flatten(),
                                        nn.Linear(512, num_classes))

    def forward(self, xb):
        out = self.conv1(xb)
        out = self.conv2(out)
        out = self.res1(out) + out
        out = self.drop1(out)

        out = self.conv3(out)
        out = self.conv4(out)
        out = self.res2(out) + out
        out = self.drop2(out)

        out = self.conv5(out)
        out = self.conv6(out)
        out = self.res3(out) + out
        out = self.drop3(out)

        out = self.classifier(out)
        return out
epochs = 140
max_lr = 0.008
grad_clip = 0.1
weight_decay = 1e-4
opt_func = torch.optim.Adam

face 폴더에 감정을 인식할 사진들 저장함
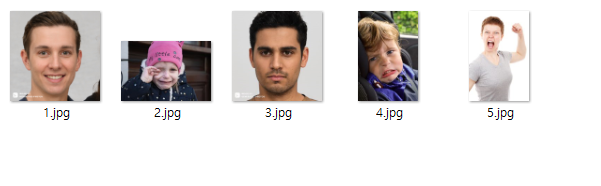
테스트 결과 4번사람 제외하고 정확하게 감정인식된 결과 확인 가능